CRYPTID: Player's Online Guidebook
Learn to play, discover solutions to confusing scenarios, and understand definitions unique to CRYPTID CCG.
Open a menu and select a page
Table of Contents
Goal and Types of Cards
Parts of a Card
Parts of a Card - Element - Name - Pyre Cost - Artwork - Rarity Skull - HP and AP - Combat Abilities - Support Abilities - Evolution - Card Type - Flavor Text - Metadata
Play Area
How to Play!
Questions and Answers
Play Area
The gameplay of CRYPTID relies heavily on positioning in a unique 2x3 card placement grid. Your placement and attention to the enemy's positioning can mean the difference between winning and losing a match!
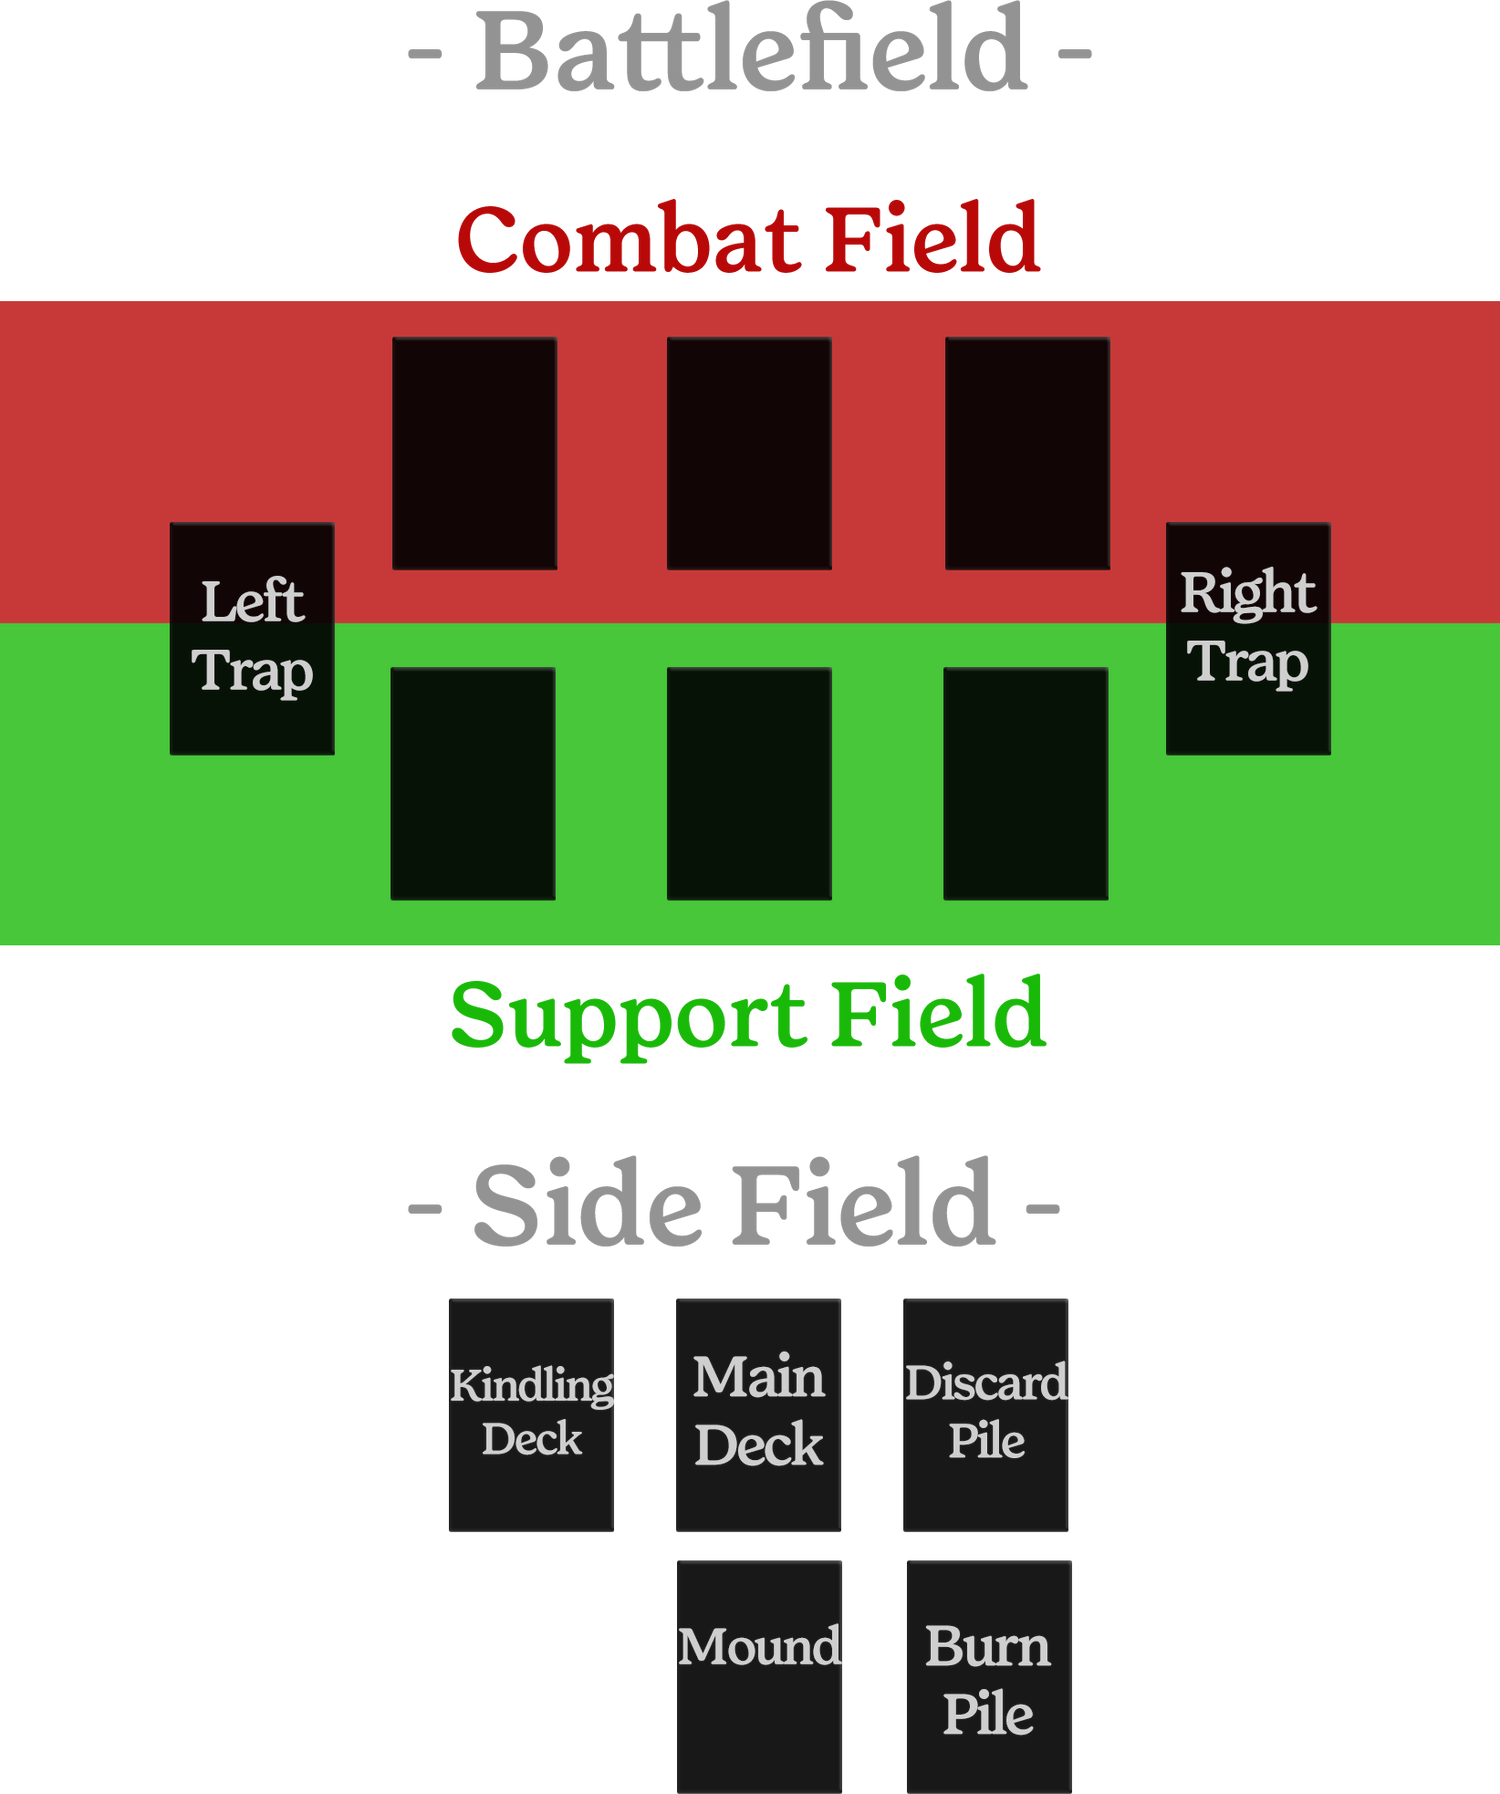
Battlefield
The Battlefield refers to the Combat, Support, and Left and Right Trap Fields (where the 'Battle' takes place).
-
Combat Field
The Combat Field makes up the top 3 card positions / top row of your side of the battlefield.
This is the default position for conjured Cryptids - If you place a Cryptid in one of the three columns on your side of the battlefield, it will automatically fall into the Combat Field (unless that place is already taken).
- Attacking and Resting -
Cryptids in the Combat Field are referred to as Combatants. Only Combatants can attack. After a Combatant attacks, whethere it is successful or not, it must turn 90 degrees to the left to indicate that it is resting. Resting Cryptids cannot attack, and Combatants that are resting may be bypassed by attacks made by enemy Combatants, leaving their Support vulnerable to attacks. If you attack an enemy column, the attack targets the Combatant UNLESS that Combatant is resting - If it is, then you may choose the Combatant OR Support as the target instead.
Combatant's receive/gain stats from their Support's (Cryptids placed below them in the green-highlighted row).
While in the Combat Field, a Cryptid Card's combat abilities take effect (depending on their conditions).
-
Support Field
The Support Field is indicated by the green-highlighted row on the bottom of the diagram shown above. Cryptids may only be placed in the Support Field of a column if there is already a Cryptid placed in the Combat Field in that column. Support Cryptids cannot attack (unless otherwise stated by an ability or effect).
Support Cryptids are referred to as Supports. Their written stats (the HP and AP shown on their card faces) are granted to the Combatant above them in the same column (aka *their* Combatant). This means you must add the written HP and AP of the Support to the current HP and AP of the Combatant.
If the Support dies, its written HP and AP is removed from its corresponding Combatant. If this causes the Combatant's HP to fall to 0 or below, the Combatant dies as well. This is called collapsing (the act of killing a support to subsequently kill its Combatant).
To avoid a collapse, protect your Supports by being aware of your Combatant's current status - Is it resting or awake? If it is awake, is it worth attacking and leaving its Support exposed afterward? These choices are very important. Some Cryptids' abilities are far more impactful in the Support Field than the Combat Field (and vice versa for others).
-
Left Trap and Right Trap Fields
The Left Trap and Right Trap are indicated by the two vertically centered card positions on either side of the battlefield which lie directly between the Combat and Support Fields. As there are only two, that means you may only have up to two traps on your side of the battlefield. And yes, placement of Trap cards matter! Some card abilities protect, negate, or even destroy Trap cards based on where they are located. Before placing a trap, make sure you are aware of the Cryptids on both sides of the field and their unique abilities.
If your enemy has Traps placed, it is advised to play a bit more cautiously. Traps have various activation conditions. Conjuring a Cryptid, activating an ability, placing your own Trap - These are all different events that might cause the enemy's Trap card to activate.
Keep in mind, even if a Trap card's conditions are fulfilled, the owner of that Trap card may choose not to use it, saving it for a different occasion.
Side Field (or Sidefield)
The Sidefield is the area where your Main Deck, Kindling Deck, Mound, Discard Pile, and Burn Pile are located.
-
Main Deck
After removing the Kindling Cryptids from your deck, the remainder of your shuffled cards go here face down. This is what you draw from at the start of each turn.
Upon drawing a card from your Main Deck at the start of your turn, you simultaneously receive a single Pyre.
-
Kindling Deck
The Kindling Cryptids removed from your deck go here face down. You may only draw a single Kindling Cryptid per turn, but it is not required unless you've been attacked when there are no Cryptids on your side of the battlefield. Once your draw a Kindling Cryptid, it must be conjured - You cannot keep a Kindling Cryptid in your hand like other cards.
You must have at least as many Kindling Cryptids as dead Cryptids required to win the match. For a standard game, this is 10 Cryptids. For a single-deck game, this is 5 Cryptids.
Use Kindling Cryptids to have something on your field and save Pyres between turns (Kindling Cryptids are completely free, after all). However, they are generally weaker than normal Cryptid cards.
Another strategy might be to save your Pyres and conjure Kindling Cryptids for the most part, which would lead to more dead Cryptids for you and insuring an earlier and more effective Pyre Burn. A risky strategy, to be sure.
-
Discard Pile
Non-Cryptid cards that are 'used up' go here. That includes Auras and Attacks that have been removed or destroyed as well as Pyre cards, Bursts and Traps that have been activated/destroyed.
-
Burn Pile
When you declare a Pyre Burn, you must transfer all the dead Cryptids in your Mound to this pile. This only occurs once per game. These Cryptids still count towards your total dead Cryptids.
Each game, each player may only declare a Pyre Burn once and only during their turn (at any point during their turn).
Cryptids killed after a Pyre Burn go to the Mound as usual. The Mound plus the Burn Pile indicate your total amount of dead Cryptids.
When you declare a Pyre Burn, you receive as many Pyres and draw as many cards as dead Cryptids you currently have.
This is a powerful technique. Use it too early, and it becomes a dud. Use it too late, and you'll go out with a bang (still losing). It is up to you to time your Pyre Burn right!
*Creator's note: I currently recommend Pyre Burns when you have between 4 and 6 dead Cryptids.